How to use this guide
This guide is your reference for everything the masterclass covers. It’s organised by topic, so you can come back to any idea when you need it, without rewatching a lesson. Each section ends with a short list of further reading for when you want to go deeper.
1. What AI engineering is
AI engineering is the disciplined practice of turning models, data and tools into one cohesive system, where:
- you decide what the model gets to see,
- you decide what it’s allowed to do,
- and you can prove that what comes back is reliable.
That’s why this guide focuses on systems rather than tools. Which model is best this month, which framework to use, protocols like MCP: these change every few months. The way you design, build and measure a system carries over to whatever comes next.
The six levels
The masterclass builds one real system, an AI code reviewer, through six levels of capability. Each level closes a gap the one before it couldn’t.
| Level | What it adds | The gap it closes | Lesson |
|---|---|---|---|
| 1. The model and prompt engineering | Shaping what the model produces | 1 | |
| 2. RAG | Your own data, retrieved when it’s needed | Knowledge: the model doesn’t know your data | 2 |
| 3. Tool use | Actions, and data computed on demand | Capability: some answers have to be computed or fetched live | 3 |
| 4. Agents | The model decides its own steps | Autonomy: the workflow can’t always be fixed in advance | 3 |
| 5. Evaluation | Proof of what the system gets right and wrong | Measurement: there’s no evidence of what the system gets right, what it gets wrong, or why | 4 |
| 6. Context engineering | The discipline that connects every level | 5 |
The model is the same at all six levels. Every improvement comes from the system built around it: what the model is shown, what it’s allowed to do, and how its work gets checked. Building that system is what AI engineering is.
2. The model
Every system in this guide is built around a large language model (LLM). Before you design anything around it, you need to know what the model does on its own, and where the information it uses comes from.
What an LLM is
An LLM is a model trained to predict the next token. You give it a sequence of text, and it generates what comes next, one token at a time. A token is a piece of text. A common word is often a single token, while a rarer word can be split into several.
It learns to do this in two stages.
- Pretraining. The model is trained on trillions of tokens of text, mostly from the internet: books, articles, code, documentation and conversations. From that text it picks up patterns: in grammar, in structure, in how concepts relate to each other, and in how reasoning flows from one step to the next. Facts are patterns in text too, so it picks up some factual knowledge along the way. “Paris is the capital of France” appears often enough to be learned. A detail about your team’s internal API appears nowhere, so the model has no pattern for it.
- Post-training. The model is then trained further, on examples of good responses and on feedback about which responses people prefer. It’s still predicting the next token. What changes is which tokens it now finds most likely: the ones that follow your instruction and answer the way an assistant would.
Once training is done, the model’s knowledge is frozen at its training cutoff. On its own, it can’t update itself or look anything up, and it won’t reliably tell you when it doesn’t know something. Any AI product that searches the web or reads your files is doing that through the system built around the model, which section 5 covers.
How it generates
At each step, the model looks at every token in the sequence so far and gives a score to every token in its vocabulary. Those scores are turned into a probability distribution: how likely each token is to come next. Given “The capital of France is”, “Paris” gets a very high probability, “London” a low one, and “banana” almost none. The model picks a token, adds it to the sequence, and repeats the process with the longer sequence until the response is complete.
Sampling. Usually, the model doesn’t simply take the most likely token. It draws from the distribution, so a less likely token still has a real chance of being picked. Always taking the top token is a valid setting, and it’s used when you want consistency. Over long, open-ended text, though, it tends to produce flat output that repeats itself.
Temperature reshapes the distribution before the model draws from it. A lower temperature sharpens it, putting more of the probability on the most likely tokens, so answers are more consistent. A higher temperature flattens it, giving less likely tokens more of a chance, which brings more variety and more risk. Most APIs treat a temperature of 0 as always taking the most likely token, and some models don’t let you change the temperature at all.
Non-determinism. Because the model samples, the same prompt can give a different answer each time. How often that happens depends on the prompt.
Take, for example, the prompt “The capital of France is”. The model saw “Paris is the capital of France” so many times in training that the token “Paris” is far more likely to come next than any other token in its vocabulary. Almost every draw picks it, so you get the same answer nearly every time. Most well-known facts work this way.
Now ask the model to write the opening line of a story, or to describe your team’s internal API, which it rarely or never saw in training. No single next token stands out. Several are about as likely as each other, so each run can pick a different one. And because every token joins the sequence the next one is predicted from, one different pick early on can take the rest of the response somewhere else.
Setting the temperature to 0 reduces this variation but doesn’t remove it. On hosted models, small differences in how the servers process each request can still change the output. So you can’t assume the same prompt will give you the same answer twice.
The probabilities at every step depend on two things: what the model learned in training, and every token in the sequence so far. That sequence (your instructions, your question, any documents you include, and what the model has already written) is called the context.
Where the model’s information comes from
Those are the two sources the model draws on.
Parametric memory is what the model learned in training, stored in its parameters, the weights of the neural network. Training compresses trillions of tokens into a fixed set of weights, far smaller than the data it learned from, so the model can’t keep everything. It keeps the patterns. Things that appear again and again are learned well. One-off details are learned weakly, or not at all. Changing this memory means training the model further, which is a separate and much heavier job than anything in this guide.
The context is everything in front of the model at the moment it generates, and it’s the part you control. It holds the actual text, so the model doesn’t have to reconstruct anything. It can read what’s there, which makes the context far more reliable than parametric memory. It isn’t perfect, though. Models can still miss or misread information in the context, and the longer the context gets, the more often that happens. This is called context rot, and it’s why the context works best when it holds what the model needs for the task, and little else.
| Parametric memory | The context | |
|---|---|---|
| What it holds | Patterns compressed from training data | The actual text you provide |
| How the model uses it | Reconstructs from patterns | Reads directly |
| Who controls it | Fixed once training ends | You, on every call |
| How current it is | Frozen at the training cutoff | As current as what you put in |
Hallucination and grounding
When parametric memory comes up short and the context doesn’t have the answer, the model often still answers. It’s trained to predict, and to be helpful, so it produces the most plausible continuation, fluent and confident, pieced together from patterns that were close enough. That’s a hallucination. Ask a model about your team’s coding standards with nothing about them in the context, and you’ll get a confident description of standards that aren’t yours.
When the context holds the right information, the model has both sources: the language and reasoning from its parameters, and the specific facts from the context. The output is grounded in what you gave it. That makes it far more reliable, and it can be checked against its source. Grounding makes hallucination much less likely without ruling it out, which is why section 7 covers how to measure it.
The context window
The context has a size limit, called the context window. Depending on the model, it holds anywhere from a few thousand tokens to millions. The limit counts everything in the request and the response the model generates, and everything you want the model to use has to fit inside it.
It’s also temporary. Nothing you put in the context is learned, and the weights don’t change. The model keeps nothing between calls. A chat only seems to remember because the whole conversation is sent again on every turn. To use any information next time, you have to put it in the context again.
That’s why most of AI engineering comes down to one problem: getting the right information into the context window, at the right time.
Resources
3. Prompt engineering
The prompt is the first part of the context you control. Prompt engineering is the practice of designing it (what you include, how you structure it and how you phrase it) so the model produces better output.
In an API call, the prompt usually has two parts. The system prompt sets the standing instructions: the model’s role, the rules it should follow and the format it should respond in. The messages carry the conversation: what the user asks, and the model’s replies so far. Both become part of the context, so both shape every token the model generates.
Four techniques
A clear, well-structured prompt is the starting point. Beyond that, four techniques each change the output in a specific way: its format, its quality, its reasoning, and how a larger task is broken down.
1. Structured output
Structured output controls the format. By default, the model replies in free-form text, which works when a person is reading it. When the output has to flow into another system, like a database, a UI or an API, that system needs data it can parse. So you have the model respond in a fixed format instead, usually JSON that follows a schema. A schema defines which fields the response must have and what type of value goes in each. That’s what turns the model’s output into something code can use.
There are two ways to get structured output, and the difference between them matters.
Describing the schema in the prompt. The first is to describe the schema in the prompt. The model usually follows it, but nothing forces it to. On some runs the JSON comes wrapped in markdown formatting, a field holds a value that isn’t one of the allowed options, or a field is missing, and the parser fails. Because the model’s output varies from run to run (section 2), you can’t predict which run will break, so you can’t build a reliable pipeline on it.
Passing the schema to the API. The second is to pass the schema to the API as a parameter. The API then restricts generation, so that at each step the model can only pick tokens that keep the output valid against the schema. This is called constrained decoding, and it means every response that completes normally matches the schema. Two cases still need handling. If the response hits the token limit, it’s cut off before it’s complete. If the model refuses the request, the refusal can come back in place of your format. Some finer rules, like the allowed range for a number, may also not be enforced, depending on your provider.
What a schema can’t check. Either way, a schema only controls the format. The values inside it are still generated by the model, and they can still be wrong. A code review can return a line number in exactly the right field, and that number can still point to the wrong line, because nothing checked it against the file.
2. Few-shot prompting
Few-shot prompting shapes the quality. Instead of only describing what a good response looks like, you include one or more examples of one in the prompt. The model calibrates to them: the tone, depth and level of detail of its response shift to match. A single good example often does more than a paragraph of instructions, because it shows the standard instead of describing it. The model can also copy the examples too closely, picking up their length, phrasing or subject. So choose examples that differ from each other in the ways you don’t want copied.
3. Chain-of-thought
Chain-of-thought shapes the reasoning. You ask the model to work through the problem step by step before it gives its final answer. Every step it writes is made of tokens, and those tokens join the context. So by the time the model writes its answer, it’s predicting from its own working as well as from the question, which helps most on problems that take several steps to solve. The trade-off is more tokens and more time. Many current models can do this on their own, through a “thinking” or “reasoning” mode you switch on. Keep in mind that the written steps don’t always reflect how the model really got to its answer. They help you follow its working, but you can’t treat them as proof.
4. Prompt chaining
Prompt chaining breaks a larger task down. Instead of asking for everything in one call, you split the task into stages and run each one as its own call. Each stage’s output is passed into the context of the next. A code review, for example, can run as three calls: one plans what to check, one carries out the review against that plan, and one checks the result.
What chaining changes. Because each stage only sees what the stage before it produced, earlier stages set the limits for later ones. If the plan leaves out a kind of issue, the review won’t look for it, even if a single-call review would have caught it. In return, each stage is something you can inspect on its own. You can read the plan, see what it missed and fix that one stage, rather than trying to get a single call to do the whole job well.
The ceiling of prompting
At this level, nothing is in the context unless you put it there yourself, by hand, before the run. Everything prompting can’t do follows from that.
| Prompting can | Prompting can’t, on its own |
|---|---|
| Structure the output | Fetch information the model wasn’t trained on |
| Calibrate quality, tone and behaviour | Reach into your documents, databases or systems |
| Make the model reason before it answers | Check its claims against anything outside the context, like a linter, a test or a live source |
| Break a complex task into steps | Search the web or call an API |
Each limit is a gap the later sections close:
- Knowledge. You could paste your team’s style guide into the prompt. You can’t paste a whole codebase, and you don’t know in advance which parts a given request needs. Section 4, RAG, closes this.
- Capability. You could run a linter yourself and paste in the output, but you have to decide that before the run. The model can’t reach a function, realise it needs a complexity score, and go and get one. Section 5, tool use, closes this.
- Autonomy. In a chain, you decide the steps in advance. The model can’t change them based on what it finds along the way. Section 6, agents, closes this.
- Measurement. Nothing in any of this tells you whether the output got better or worse. Section 7, evaluation, closes this.
You can’t prompt your way to information the model doesn’t have, or to an action it can’t take.
Resources
- Anthropic, “Prompt engineering overview”
- Google, “Prompt design strategies”
- Anthropic, “Structured outputs”
- OpenAI, “Structured Outputs”
- Brown et al., “Language Models are Few-Shot Learners”
- Wei et al., “Chain-of-Thought Prompting Elicits Reasoning in Large Language Models”
- Anthropic, “Reasoning models don’t always say what they think”
4. RAG: connecting your data
Section 3 ended on the first gap: knowledge. A model working only from its parameters doesn’t know your team’s standards, the code that already exists in your codebase, or how your services fit together. So it answers like a competent stranger, someone with solid general knowledge who has never worked on your team. Most of what an insider knows is already written down in your team’s own files. It just isn’t in the context.
What RAG is
Retrieval-Augmented Generation (RAG) puts that information in the context. The term comes from a 2020 paper by Lewis et al. Before the model generates, you search your own data, find the pieces that are relevant to this specific request, and add them to the prompt. The model then generates from them.
RAG doesn’t change the model. Its parameters stay exactly as they were, and it learns nothing new. Everything happens in the context, so you control what the model works from by controlling what gets retrieved.
Why not put everything in the context?
Some context windows now hold over a million tokens, so it’s fair to ask why you’d retrieve at all, instead of sending everything. There are three reasons.
Cost. Say your codebase is about 200,000 tokens, which isn’t large, and you send all of it with every request. At 10,000 requests a day, that’s 2 billion input tokens a day. At $1 per million input tokens, that comes to $2,000 a day, or about $60,000 a month, before you’ve paid for a single output token. And for any one request, perhaps one or two files were actually relevant. Prompt caching, which many providers offer, makes repeated content cheaper to resend. It doesn’t make it free, and it doesn’t help with the next two problems.
Quality. Everything in the context shapes the model’s output (section 2), including everything that has nothing to do with the request. This causes two problems.
- Dilution. The model does focus on the parts of the context that look relevant, but that focus is shared across everything in it. The more irrelevant material there is, the more it competes with the parts that matter. Content that looks related but isn’t can also pull the output in the wrong direction.
- Degradation. As the context gets longer, the model gets worse at using it. Models tend to use information near the beginning and end of a long context more reliably than information in the middle, and accuracy drops as the context grows, even when the answer is in there. This is the context rot from section 2.
So the more you add, the less reliably the model uses the part it actually needed.
Scale. A real organisation’s knowledge (wikis, documentation, chat threads, code repositories, databases) won’t fit in any context window. Even if it did, the first two problems would remain.
Sending more context doesn’t make the model’s job easier. What helps is selecting the part that matters for this request, at this moment.
How RAG works
A RAG pipeline runs in two phases.
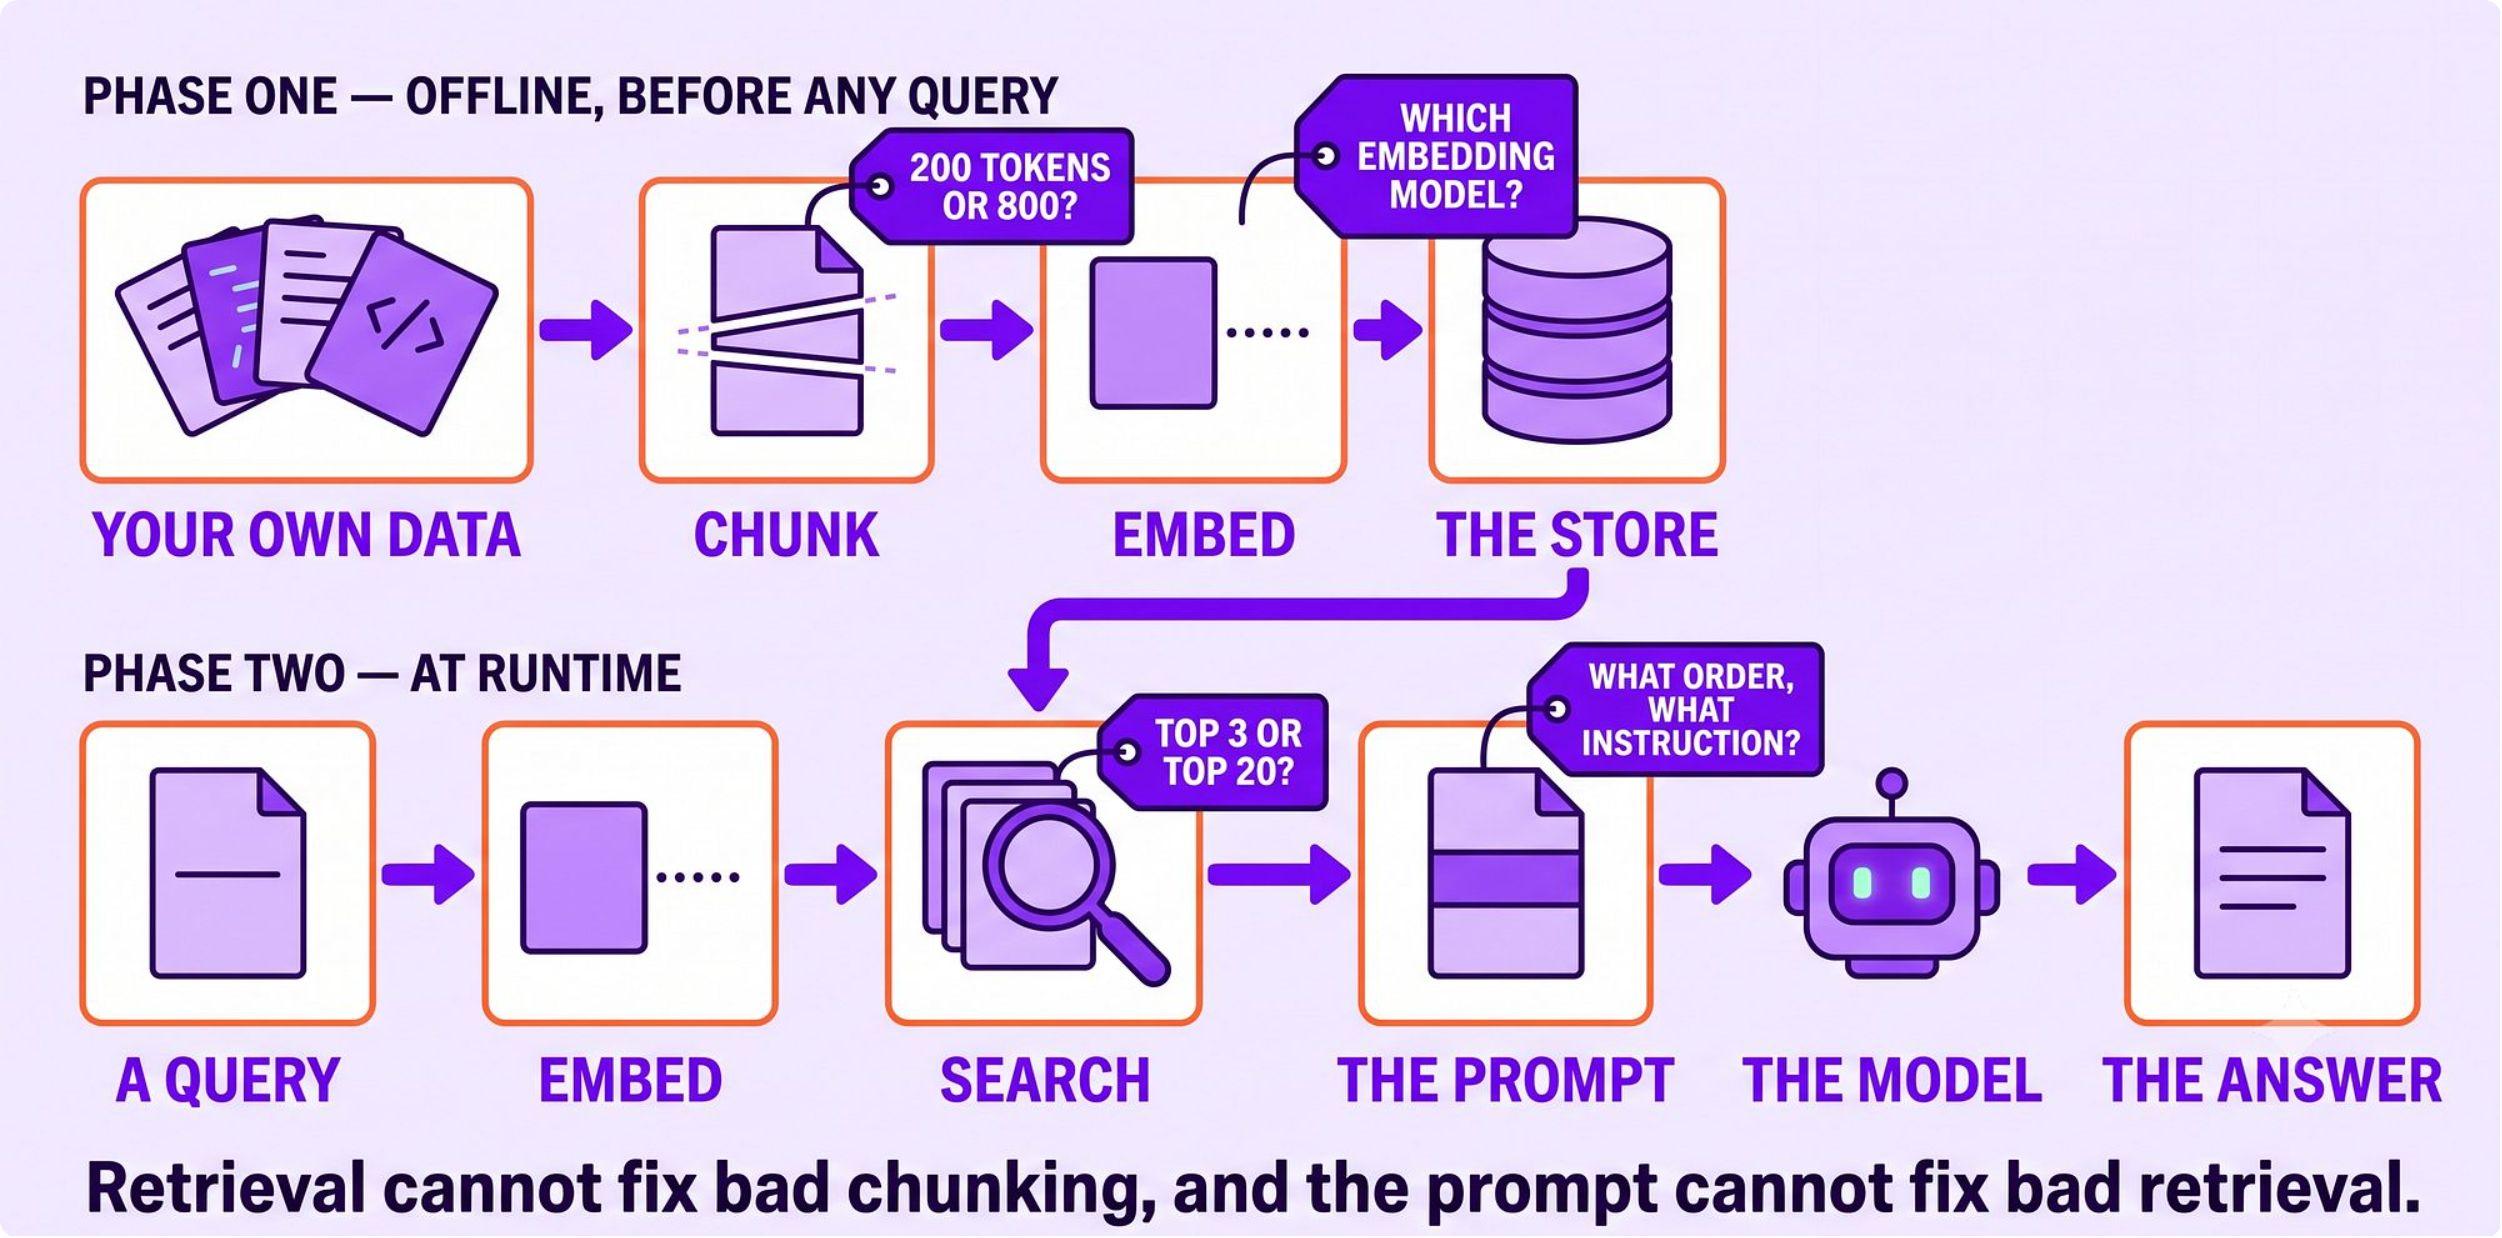
Offline: preparing your data
This happens before any request comes in.
- Chunk. Split each document into chunks. A chunk is one retrievable unit of meaning: a function, a section of a style guide, a block of related code. It should be small enough that retrieval stays precise, and complete enough to make sense on its own. A chunk cut off from part of its meaning, like a function separated from the docstring that explains it, gives the model only part of what it needs. The model fills in the rest from its parameters, and that’s exactly where hallucinations come from.
- Embed. Convert each chunk into an embedding: a vector, a list of numbers that represents the chunk’s meaning. An embedding model is trained so that text with similar meanings ends up with similar vectors. “Password hashing” and “bcrypt with salt” end up close together, even though they share no words. How close two pieces of text are in meaning is called semantic similarity.
- Store. Save each vector, together with the chunk it came from, in a vector database. Its job is to find the vectors closest to a query, fast. With a handful of chunks, you could compare the query against every one. With millions, that’s too slow, so a vector database organises the vectors in advance and only searches the most promising regions. This is called approximate nearest neighbour search: it gives up a little exactness for a large gain in speed.
At runtime: answering a request
- Embed the query with the same embedding model, so the query and the chunks are directly comparable.
- Find the nearest chunks, the ones closest in meaning to the query.
- Add them to the prompt, so the model generates from your actual data.
Searching by meaning with embeddings is the usual choice for unstructured text, like documents, wikis and code, where people describe what they need in their own words. It isn’t the right fit for everything. When the exact term matters, as with an error code or a function name, keyword search works better. Many production systems run both and combine the results, which is called hybrid search. When the data is structured, like rows in a database, retrieval is often a query against that database instead.
The offline phase isn’t something you do once. When your data changes, the affected chunks have to be re-embedded, or retrieval returns outdated information. If you switch embedding models, you have to re-embed everything, because vectors from different models can’t be compared.
The decisions that set retrieval quality
Every step in the pipeline is a decision, and each one changes what the model ends up seeing.
Chunking. How you split your data decides what can be retrieved at all, and it can go wrong in both directions. Split too small, and a chunk loses part of its meaning. If a boundary falls between a function’s docstring and its body, a search can return half the function, and the model answers from an incomplete picture. Split too big, and a chunk covers several topics at once. Its embedding becomes a blend of all of them, so it matches no specific query well, and when it is retrieved, it brings a lot of irrelevant text into the context along with the part that mattered. The same applies outside code: a policy paragraph split from its examples, or a legal clause split from the definitions it depends on. Every type of content has its own structure, and your chunking needs to respect it.
The embedding model. The embedding model defines what “similar” means in your system. Some models are better at technical text, some at general language, and some at code. A general-purpose model also learned what “similar” means from public text, so it may not know your domain. Internal project names, product codes or team jargon may not land close to the things they relate to. That’s why teams test embedding models on their own data before choosing one, and some fine-tune one on it.
How many results to retrieve. Retrieve too few, and you miss information the model needed. Retrieve too many, and you add noise that dilutes the context.
The first search is built for speed. It compares the query against vectors that were computed in advance, without knowing what the query would be. So its top results are a good shortlist, but not a precise ranking. Reranking is a second step that takes that shortlist and uses a more accurate model to score how relevant each result really is. This model usually reads the query and each chunk together. The shortlist is then reordered, and only the best results go to the model. Because reranking runs only on the shortlist, you get most of the benefit of the slower, more accurate model without running it on everything.
The query itself. Users describe what they need in their own words, and not always well. Someone asking “how does auth work?” may need one specific token-verification flow. Since retrieval can only be as good as the query, production systems often add a step that rewrites or expands the query before searching.
The trade-offs between them. A stronger embedding model retrieves better, but it costs more and runs slower. Retrieving more chunks improves coverage, but adds tokens and latency to every request. These choices aren’t independent: chunking affects how well the embeddings represent the content, the embeddings affect what retrieval finds, and retrieval decides what the model sees. You’re tuning one connected system.
Getting a RAG demo to work is quick. Getting RAG to work reliably in production is a different job. You have to make each of these decisions well for your own data, measure what retrieval finds and what it misses, keep the index current as the data changes, and manage the cost and latency of every step at scale. It’s a discipline in its own right, and many AI teams have engineers who specialise in retrieval alone.
What RAG changes, and what it doesn’t
With RAG, the same model reviewing the same code can point to your team’s existing functions, quote your own standards, and see that a bug in one service will cause failures in another that depends on it. The model hasn’t become smarter. It sees more, and it generates from what it sees.
The same holds in reverse: the output can only be as good as what was retrieved. If retrieval returns the wrong chunks, or misses the right one, the model works from those, and it can be just as confident about them.
Where RAG is used
RAG is behind almost every AI application that works with an organisation’s own data:
- Coding assistants index your codebase and retrieve relevant code for each request.
- Customer support systems answer from your product documentation.
- Enterprise search answers questions across wikis, documents and chat history.
- Legal, medical and financial tools use it because a hallucinated answer there is a liability, and grounded answers can be checked against their sources.
- AI search engines like Perplexity retrieve from the web before answering.
- Tools like NotebookLM answer only from the documents you upload.
The ceiling of RAG
Retrieval can only find what’s already written down. A code review also needs information that doesn’t exist until something produces it: exact line numbers from a linter, a measured complexity score, or whether an API is deprecated according to today’s documentation. These need something to run, like an analysis tool on the file or a search against live documentation. That’s the next gap, capability, which section 5 closes.
Resources
- Lewis et al., “Retrieval-Augmented Generation for Knowledge-Intensive NLP Tasks”
- Shi et al., “Large Language Models Can Be Easily Distracted by Irrelevant Context”
- Liu et al., “Lost in the Middle: How Language Models Use Long Contexts”
- Chroma, “Context Rot”
- Anthropic, “Contextual Retrieval”
- Pinecone, “What is a Vector Database?”
- Sentence Transformers, “Retrieve & Re-Rank”
Go deeper
5. Tool use and MCP
Section 4 ended on the next gap: the model can’t take actions. Retrieval can only find information that’s already written down, but a lot of what a task needs doesn’t exist until something produces it, like a linter’s findings on a file, a complexity score, or what today’s documentation says about an API. To get that, something has to run, and on its own, the model can only generate text.
What tool use is
Tool use gives the model a way to request actions while it works. Instead of guessing what a linter would find by reading the code, the model can ask for the linter to be run, and then work from the real results.
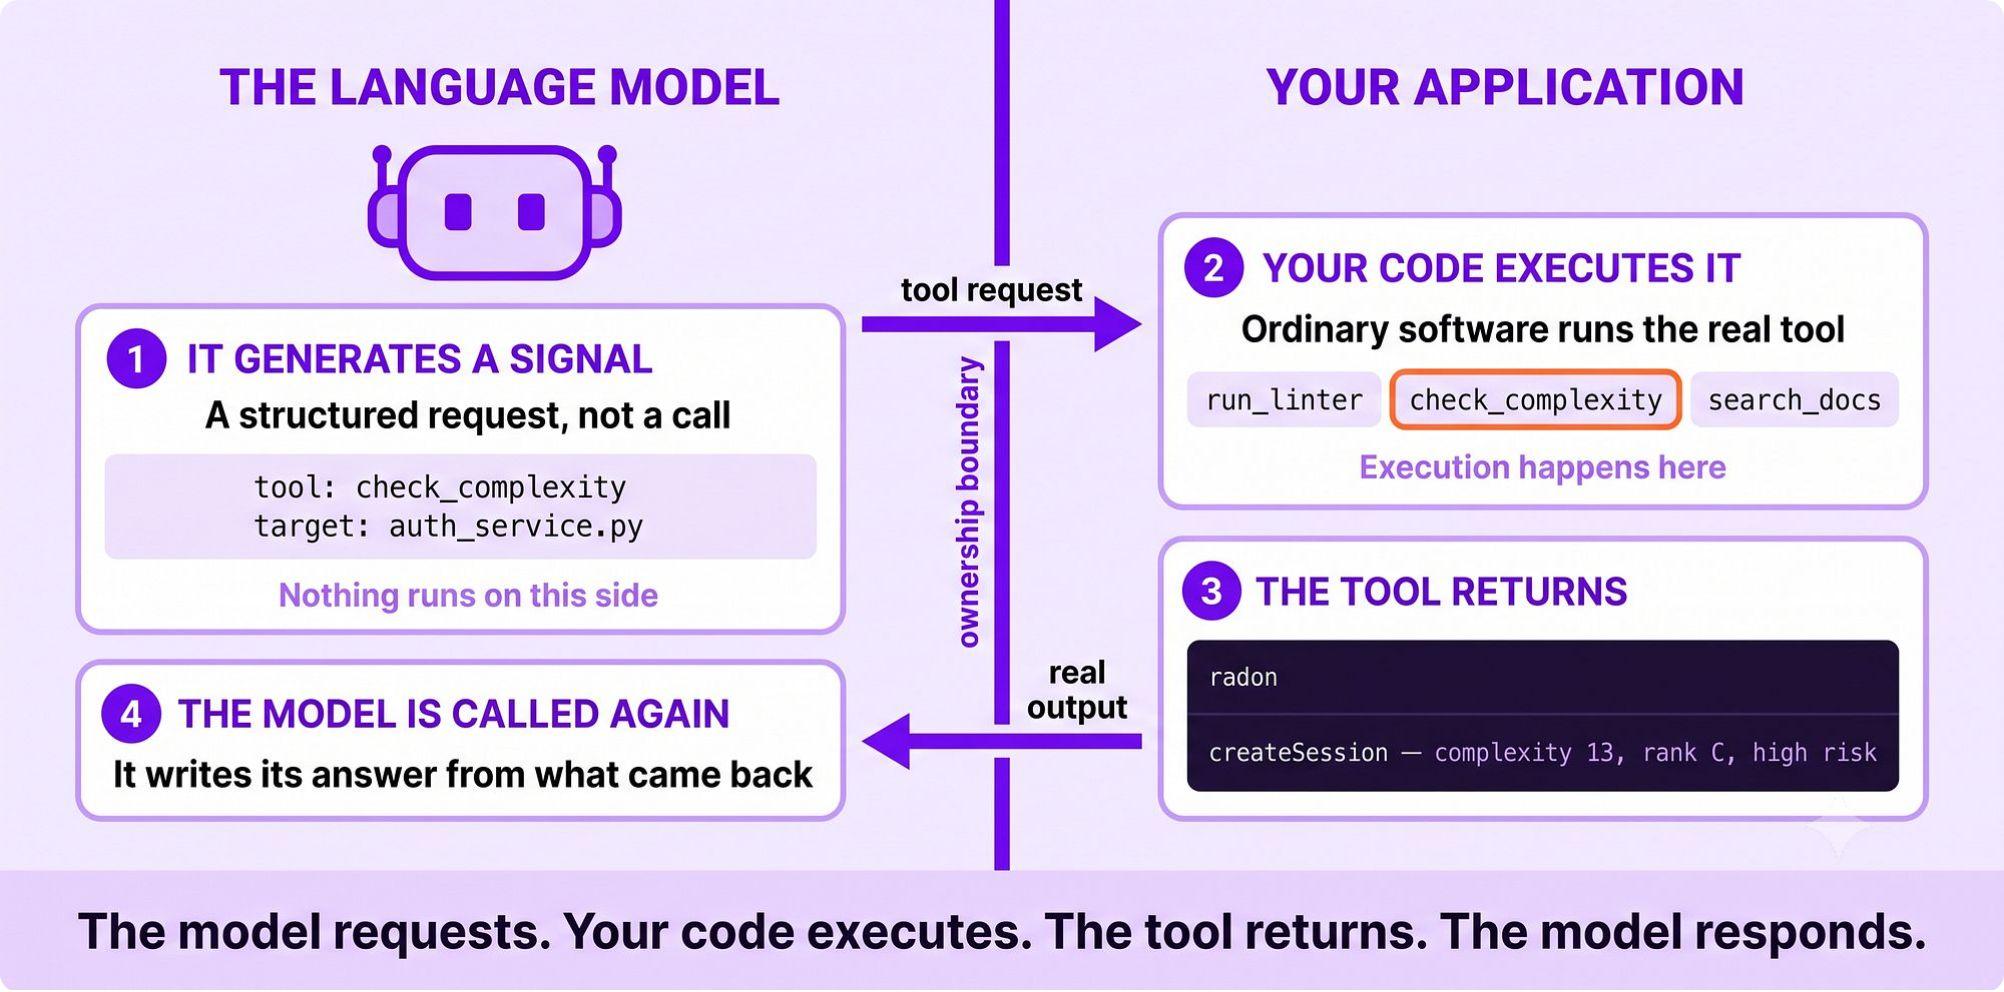
The model never runs anything itself. It’s a language model, and all it produces is tokens. What it can produce is a structured request to use a tool. Your code does the rest.
How function calling works
The mechanism behind tool use is called function calling, and it runs as a loop between the model and your code.
- You define the tool. A tool definition has a name, a description of what the tool does and what it returns, and a schema for the inputs it takes. You send the definitions with your request, so they sit in the model’s context. That’s how the model knows which tools exist.
- The model requests a tool. When the model decides a tool would help, it generates a structured request: this tool, with these arguments. It can also request several tools at once, when the calls don’t depend on each other.
- Your code runs it. Your code reads that request, runs the real function with those arguments, and gets the result.
- The result goes back into the context. Your code calls the model again, now with the tool’s result in its context. The model continues from there, and it can request another tool or write its answer.
So the answer is grounded in what the tool actually returned. In the masterclass demo, the review went from calling a function “excessively complex” to giving it a measured complexity score of 13, and every finding came with the exact line it was on.
Designing a tool
The definition is the model’s only interface to the tool. The model never sees your function’s code. It decides whether to use a tool, and with what arguments, entirely from the name, the description and the input schema. A vague description leads to a tool being used at the wrong time, or not at all.
What the tool does is a design decision. A linter can check for hundreds of rules. Which ones you turn on decides what the model can find, and whether the description you wrote is actually true.
What the tool returns goes straight into the context. Raw tool output is often verbose, full of fields the model doesn’t need. Everything you return competes with the parts that matter (section 4), so return only what the model needs to do its job.
Every tool you offer costs context. All the tool definitions are in the context on every call, whether they’re used or not. With three tools, that’s small. With dozens, the definitions take up real space, and choosing between similar tools gets harder for the model.
When tools go wrong
Tools let the model affect real systems, so the ways it can go wrong matter more.
The model’s request can be wrong. It can pick the wrong tool, pass arguments that don’t fit, or skip a tool it should have used. Many APIs can enforce your input schema on tool requests, the same way they enforce output schemas (section 3), but a valid request can still be the wrong one. Validate arguments in your code before running anything.
Treat every request as untrusted input. A tool should only be able to do what the task needs. Read-only access is safer than write access, and actions that are hard to undo, like deleting data, sending messages or spending money, should need a person’s approval.
Tool results can carry instructions. A web page or document that a tool returns goes into the model’s context like everything else. If it contains text written to look like instructions, the model may follow them. This is called prompt injection, and it’s why content from outside your system should never be treated as trusted.
Tool use and retrieval
Retrieval and tool use both put information into the context, but they get it in different ways. Retrieval looks things up in data you already have. Tool use takes an action, and brings back whatever that action produces: a measurement computed on the spot, or a page fetched live from outside your data.
The two also combine. Retrieval can itself be offered to the model as a tool, so the model searches your data when it decides it needs to. That’s how retrieval fits into an agent (section 6).
MCP: the Model Context Protocol
A tool you write for one application is wired into that application. If another application wants the same tool, someone writes that wiring again. Across an organisation, every application ends up connecting to the same tools in its own way.
MCP is a standard for how a tool is described and connected. You expose a tool once, through an MCP server, and any application that supports MCP can ask the server which tools it offers, what each one does and what inputs it takes, and then call them. MCP servers can also offer data and ready-made prompts, but tools are the most common use.
How it relates to APIs. An MCP server is usually a thin wrapper around APIs a team already has. The difference is that every API has its own shape: its own authentication, its own schema and its own documentation, so connecting one to an AI application means writing custom glue code each time. MCP standardises that shape: one agreed way to describe a tool, and one agreed way to call it.
What it doesn’t change. Function calling works exactly as before. The model still requests a tool, code still runs it, and the result still comes back into the context. What MCP changes is how many applications can reach the same tool without new integration work.
Where it comes from. Anthropic introduced MCP in November 2024. It has since been adopted across the major AI platforms, and in December 2025 it was donated to the Agentic AI Foundation under the Linux Foundation, so it’s governed as an open, vendor-neutral standard.
Connecting an MCP server means trusting it, because its tool descriptions and results go into your model’s context. Everything under “When tools go wrong” applies to servers you didn’t write, and more so.
The ceiling of tool use
With tools, the system’s output is built from measured facts instead of estimates. But the workflow is still yours. You decide which steps run, in what order, and which tools each step can use, and the model carries out that design. An engineer reviewing code doesn’t work like that. They notice something, look into it, and decide what to check next based on what they find. A fixed workflow can’t react to what it discovers. That’s the next gap, autonomy, which section 6 closes.
Resources
6. Agents
Section 5 ended on the next gap: autonomy. Up to this point, every decision about how the system works has been yours. You decided what to retrieve and when, which tools to run, and in what order. The model did the work inside each step, but the path through the task was one you wrote in advance.
That works when you know the path ahead of time. It breaks down when the right next step depends on what the last one found. An engineer reviewing code doesn’t follow the same checklist every time. They notice something, look into it, and decide what to check next based on what they find. A workflow written in advance can’t do that, because it runs the same steps whatever it discovers along the way.
What an agent is
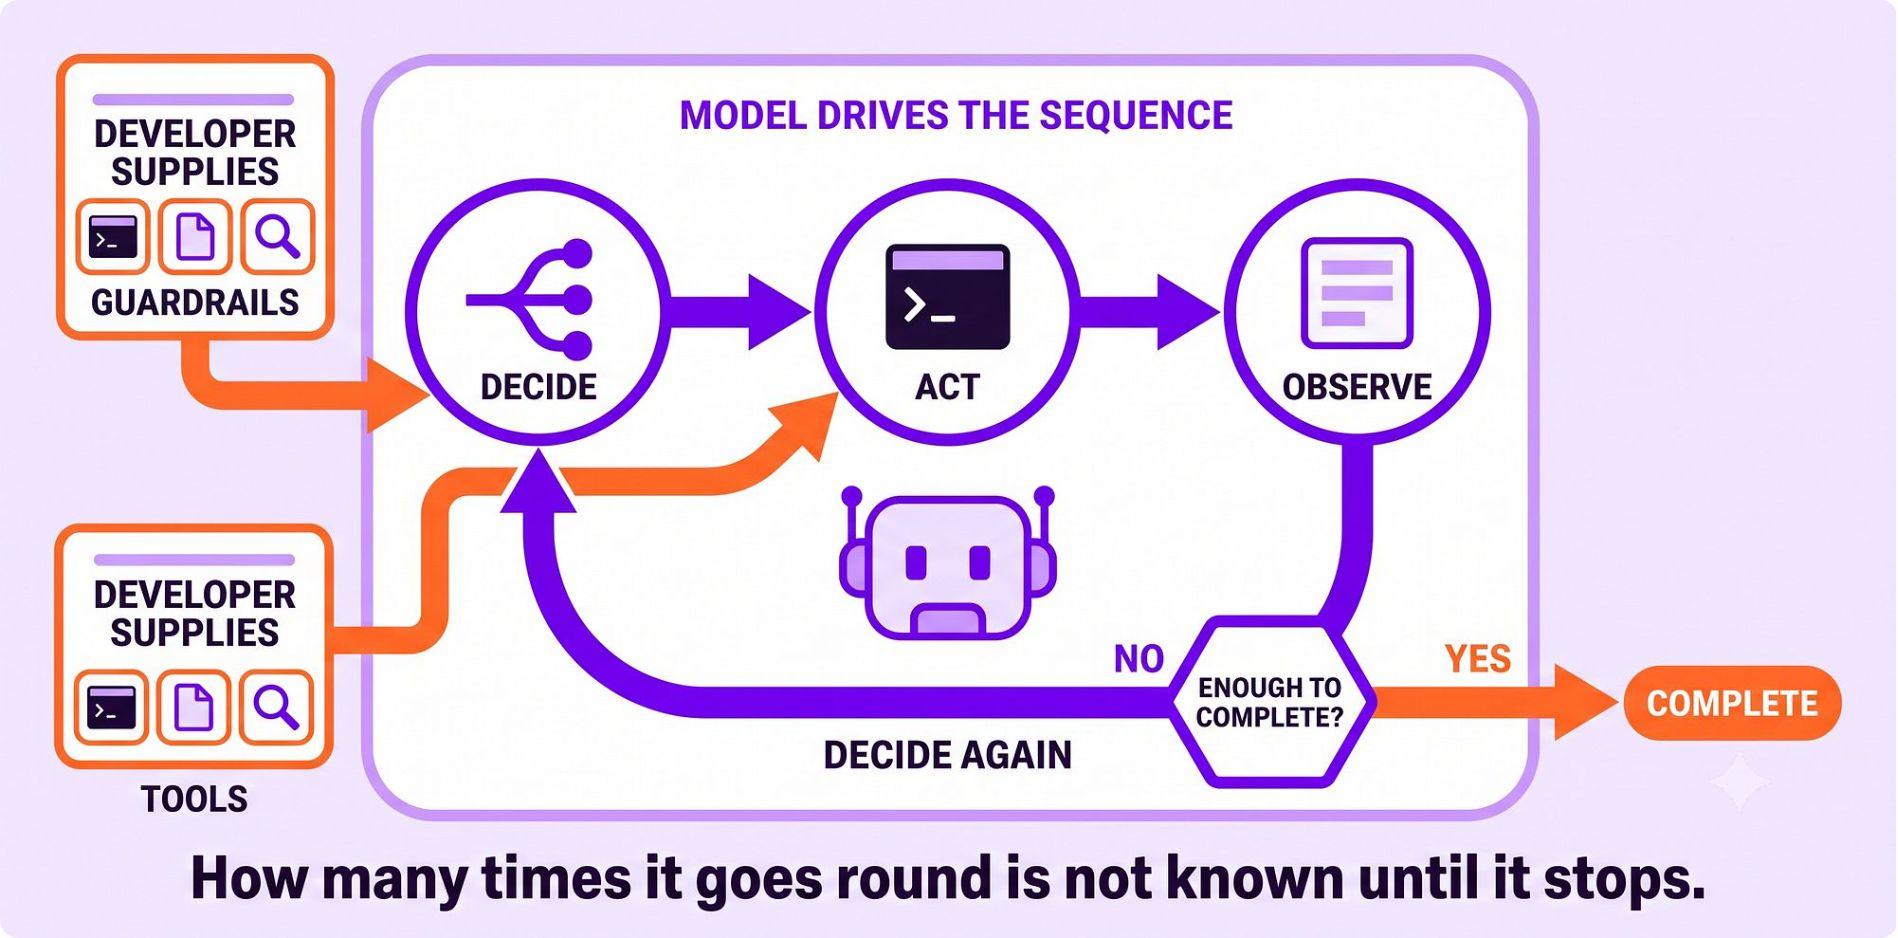
An agent is a system where the model runs in a loop. It decides what it needs, takes an action, observes the result, and decides again. The loop continues until the model judges it has enough to complete the task.
What changes is who decides the sequence. You still fix the goal, the tools the agent can use, and what a complete result has to cover. You no longer fix which tool it calls, in what order, or when it has done enough. The agent decides that as it goes, and each step responds to what the previous one turned up.
What an agent needs
An agent comes down to four pieces:
- A model that can request tools (section 5).
- The tools themselves, each defined well enough that the model can tell when to use it and what to send it.
- A loop. Your code runs whatever the model requests, puts the result back into the context, and calls the model again.
- A way to stop. The loop normally ends when the model replies with its answer instead of requesting another tool. But a model can get stuck, calling tools again and again without getting closer to an answer, and every one of those calls costs time and money. So you also set a maximum number of steps, after which the loop stops, wherever it has got to.
Agent frameworks provide these pieces ready-made. The parts that shape the result are still yours to design: the tools, and the brief.
Designing the brief
The brief is the agent’s system prompt. It’s in the context on every turn of the loop, so it’s the one part that stays constant while everything else changes. A good brief covers:
- Who the agent is and how it should work. For example, a senior engineer reviewing a pull request, who plans first, gathers what they need, and then writes.
- What a complete result must cover. For a review, that’s the categories to check, and the evidence that should back each one.
- The output format, and the rules that matter most, such as “every finding must carry its evidence”.
A good brief leaves out the sequence: which tool to call, in what order, and when to stop. That’s what you’re handing to the agent.
Giving the agent a map of what exists
When retrieval becomes a tool, the agent decides when to search your data and what to search for. Search, though, only returns what’s closest to the query. It can’t tell the agent what exists but didn’t come back. So when a search misses, the agent can’t tell whether the query was worded badly, was too broad, or the thing simply isn’t there, and it may just move on.
Giving the agent a short map of what exists, like the names of the files and functions in a codebase, solves this. The agent knows what’s there before it goes looking, so it can notice when a search hasn’t found something it should have, and search again. Keep the map lean: names only, with the tool still doing the fetching. At larger scale, deciding what overview the agent gets, and what moves in and out of its context as it works, becomes a design problem of its own (section 8).
The autonomy spectrum
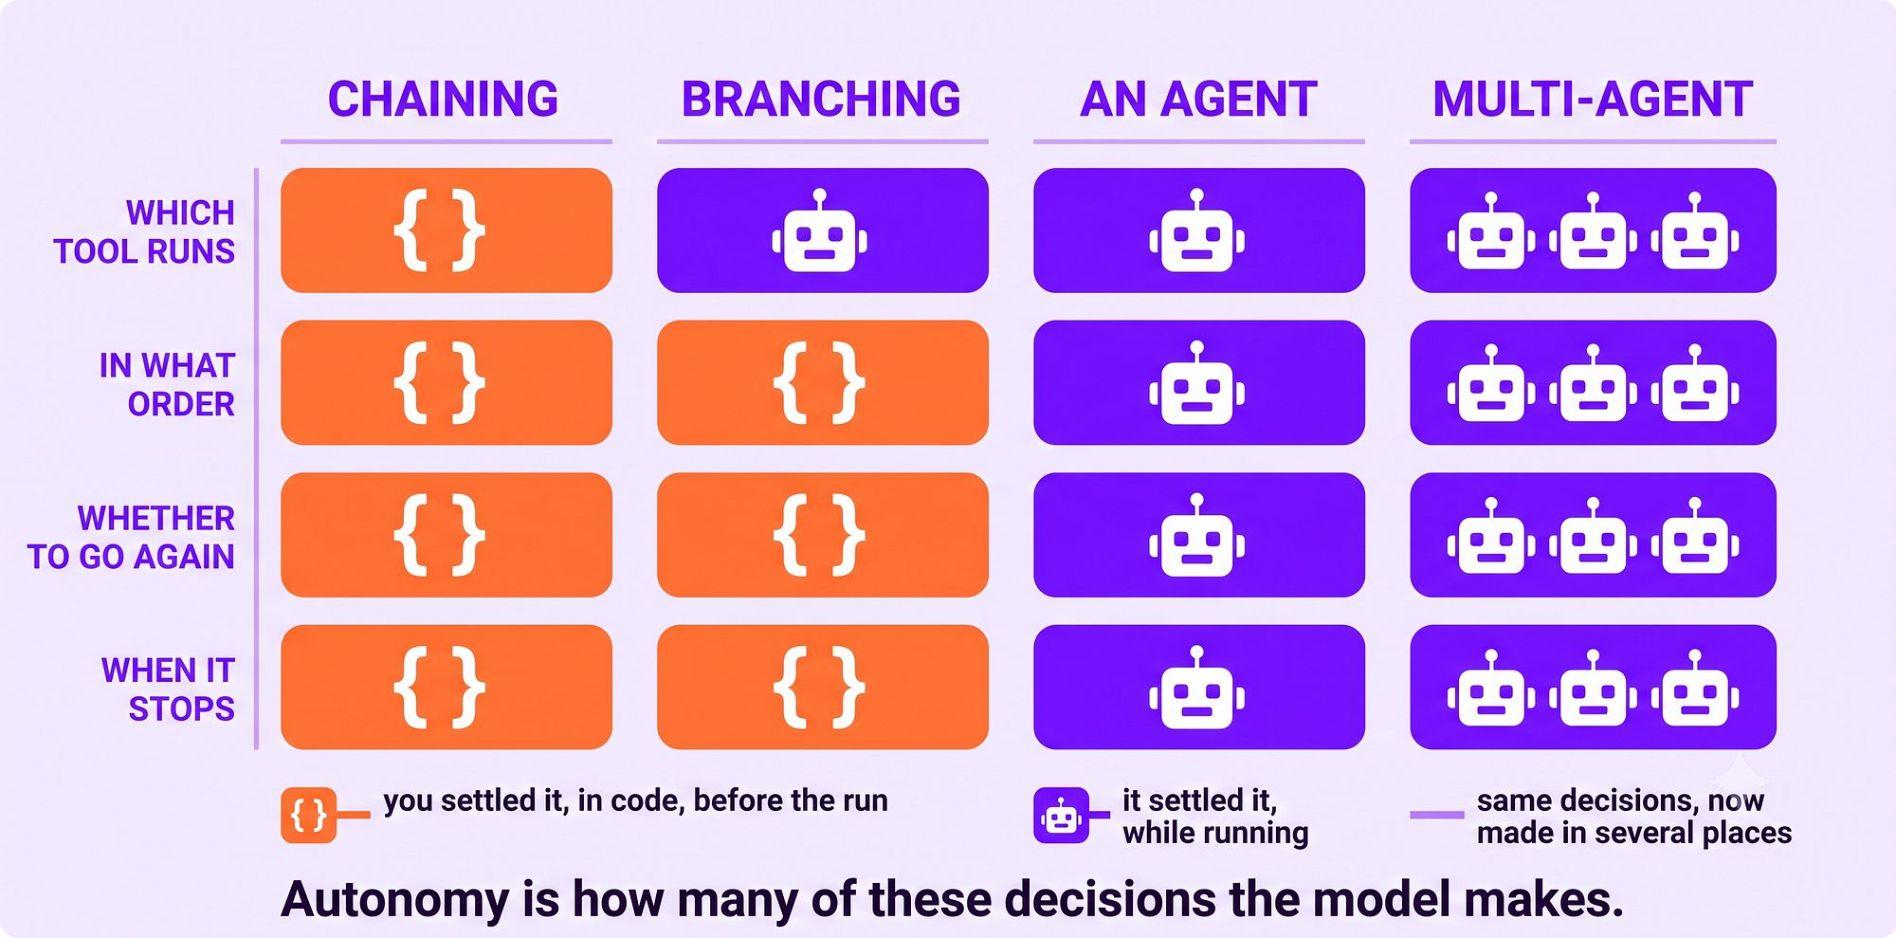
Autonomy isn’t all or nothing. Systems built around a model sit on a spectrum, depending on how much of their behaviour is decided by code you wrote, and how much by the model while it runs. The further along the spectrum you go, the more the model decides.
| What the model decides | What your code decides | |
|---|---|---|
| Single call | The content of the response | Everything else: when the call happens, what goes in, what happens to the output |
| Chain | The content at each step | The steps and their order. Every run follows the same path |
| Branching chain | Which path to take, such as routing a support message to refunds, bugs or a human | Every path that can run. You wrote them all and could list them |
| Agent | Which tools to call, in what order, and when it’s done | The goal, the tools and the limits |
| Multi-agent | Each agent decides within its own scope, and agents can hand work to each other | The goals, and how the agents are connected |
What you trade
Moving along the spectrum trades determinism for autonomy. The model doesn’t get smarter as you move, and the tools don’t get better. What changes is how much of the system’s behaviour is decided by code you wrote, and how much by the model at runtime.
Predictability. No step on the spectrum gives you deterministic output: even a single call can answer differently each time (section 2). What a chain gives you is a deterministic control flow. The steps run in the order you wrote, every time. With an agent, the control flow varies too. Run it twice on the same input, and it can take different paths, call different tools and reach different findings. That means more things can vary between runs, and more places where a mistake can enter and carry through to the result.
Cost and latency. More autonomy usually means more model calls. In a loop, each call carries the whole conversation so far, so the tokens pile up as the run goes on. Prompt caching lowers the cost of resending that history, but it doesn’t remove it. Anthropic reports that agents typically use about 4 times as many tokens as chat interactions, and multi-agent systems about 15 times as many. The calls also run one after another, so the time adds up. And because the model decides how many steps a run takes, you can’t read the cost of a run off the code the way you can with a fixed workflow.
Debugging. When a fixed workflow goes wrong, you know which step to check. When an agent goes wrong, you first have to find out what it did. Log every step of every run: what the model decided, which tools it called, what it sent and what came back.
Security. Every risk from section 5 grows when the model chooses its own actions. The most serious is an agent that can read private data, takes in untrusted content like web pages or emails, and can send information out. Content written to look like instructions can then lead the agent to leak that data. If an agent needs all three, limit what each tool can do, and require a person’s approval for actions that send data out.
Choosing where to sit
Anthropic’s guidance for building systems with LLMs is to find the simplest approach that works, and add complexity only when you need it. A fixed workflow gives you consistency and predictability on a task you can define in advance. An agent is the right choice when you can’t lay out the path in advance, but you can still check whether it’s getting there. In practice, start at the simpler end, and move toward autonomy only when you have evidence that the simpler version falls short on the real task. Where your system sits on the spectrum should be a decision you can defend.
What’s still missing
An agent can produce a result that looks stronger than anything before it. But “looks” is all you can say. Did it catch everything it should have? What did it miss? Would it reach the same result on the next run, when it might take a different path? Is it actually better than the simpler system it replaced? Without measurement, you can’t answer any of these. That’s the last gap, measurement, which section 7 closes.
Resources
7. Evaluation
Section 6 ended on the last gap: measurement. A system can produce output that looks better than ever, and you still can’t say whether it catches what it should, what it misses, or whether it’s better than what it replaced. Evaluation is how you answer those questions with evidence.
Why AI applications need a different kind of testing
In traditional software, every decision is written out in the code, so the same input always produces the same output. That’s what makes it straightforward to test. For each input, you know in advance exactly what the correct output is, so a test runs the code with that input and checks that the result matches. If it doesn’t, the test fails.
An AI application doesn’t work that way. Run the same code review twice on the same code and you’ll get different findings, different wording and different severity ratings (section 2). And for most tasks there isn’t one correct output to match. There’s a whole range of outputs that would all be acceptable. So there’s no single expected value you can write down in advance and check against.
So instead of asking whether an AI application’s output matches an expected value, evaluation asks three questions about it:
- Coverage: of everything that mattered, how much did it find?
- Correctness: of everything it said, how much holds up?
- Consistency: does it do both reliably enough, across runs and across inputs, to depend on?
Evaluation is also the only way to tell whether a change helped or hurt. Without it, every change to a prompt, a retrieval setting or a tool is a guess you can’t defend.
The two parts of an evaluation
To evaluate a system, you need a definition of what a correct output contains, and a way to compare what the system produced against that definition. These are the ground truth and the judge.
Ground truth
Ground truth is the list of what the system should have produced, written down before you score anything.
It matters most for the mistakes a system makes by leaving things out. When an output says something, you can check it by reading it. When it leaves something out, there’s nothing to read: a review doesn’t mention the vulnerability it walked past, a summary doesn’t flag the point it dropped, and a retriever doesn’t report the document it never returned. The only way to see what’s missing is to compare the output against a list of what should have been there.
How you build it. In the masterclass demo, the issues were planted in the code deliberately, so the answer key was complete from the start. That’s the one situation where ground truth is free. In a real system, you build it yourself: from real examples labelled by people who know the domain, from test cases generated synthetically, and from failures you’ve seen in production. It’s one of the hardest and slowest parts of evaluation, and it sets the limit on everything after it, because a failure that isn’t in your ground truth won’t be tracked by your evaluation.
Make it represent the real workload. One pull request with 19 issues shows the principle. A production code reviewer handles every pull request across many repositories, so its ground truth has to cover the languages it sees, from small fixes to large changes, and the failures it has shown in real use.
Tagging by what it takes to find. A single overall score tells you how the system did, but not why. In the demo, every issue was also tagged with what it takes to find:
- generic: visible in the file itself,
- tools: needs something to be run or looked up,
- codebase: needs the team’s other code.
Those tags matched the capabilities the system was built from, so the results could be broken down by them. They showed what retrieval and tools each added, and where the system fell short. What you tag by depends on your system, but the principle holds for any of them: the more precisely your ground truth is tagged, the more precisely your results can show where the system is strong and where it isn’t.
The judge
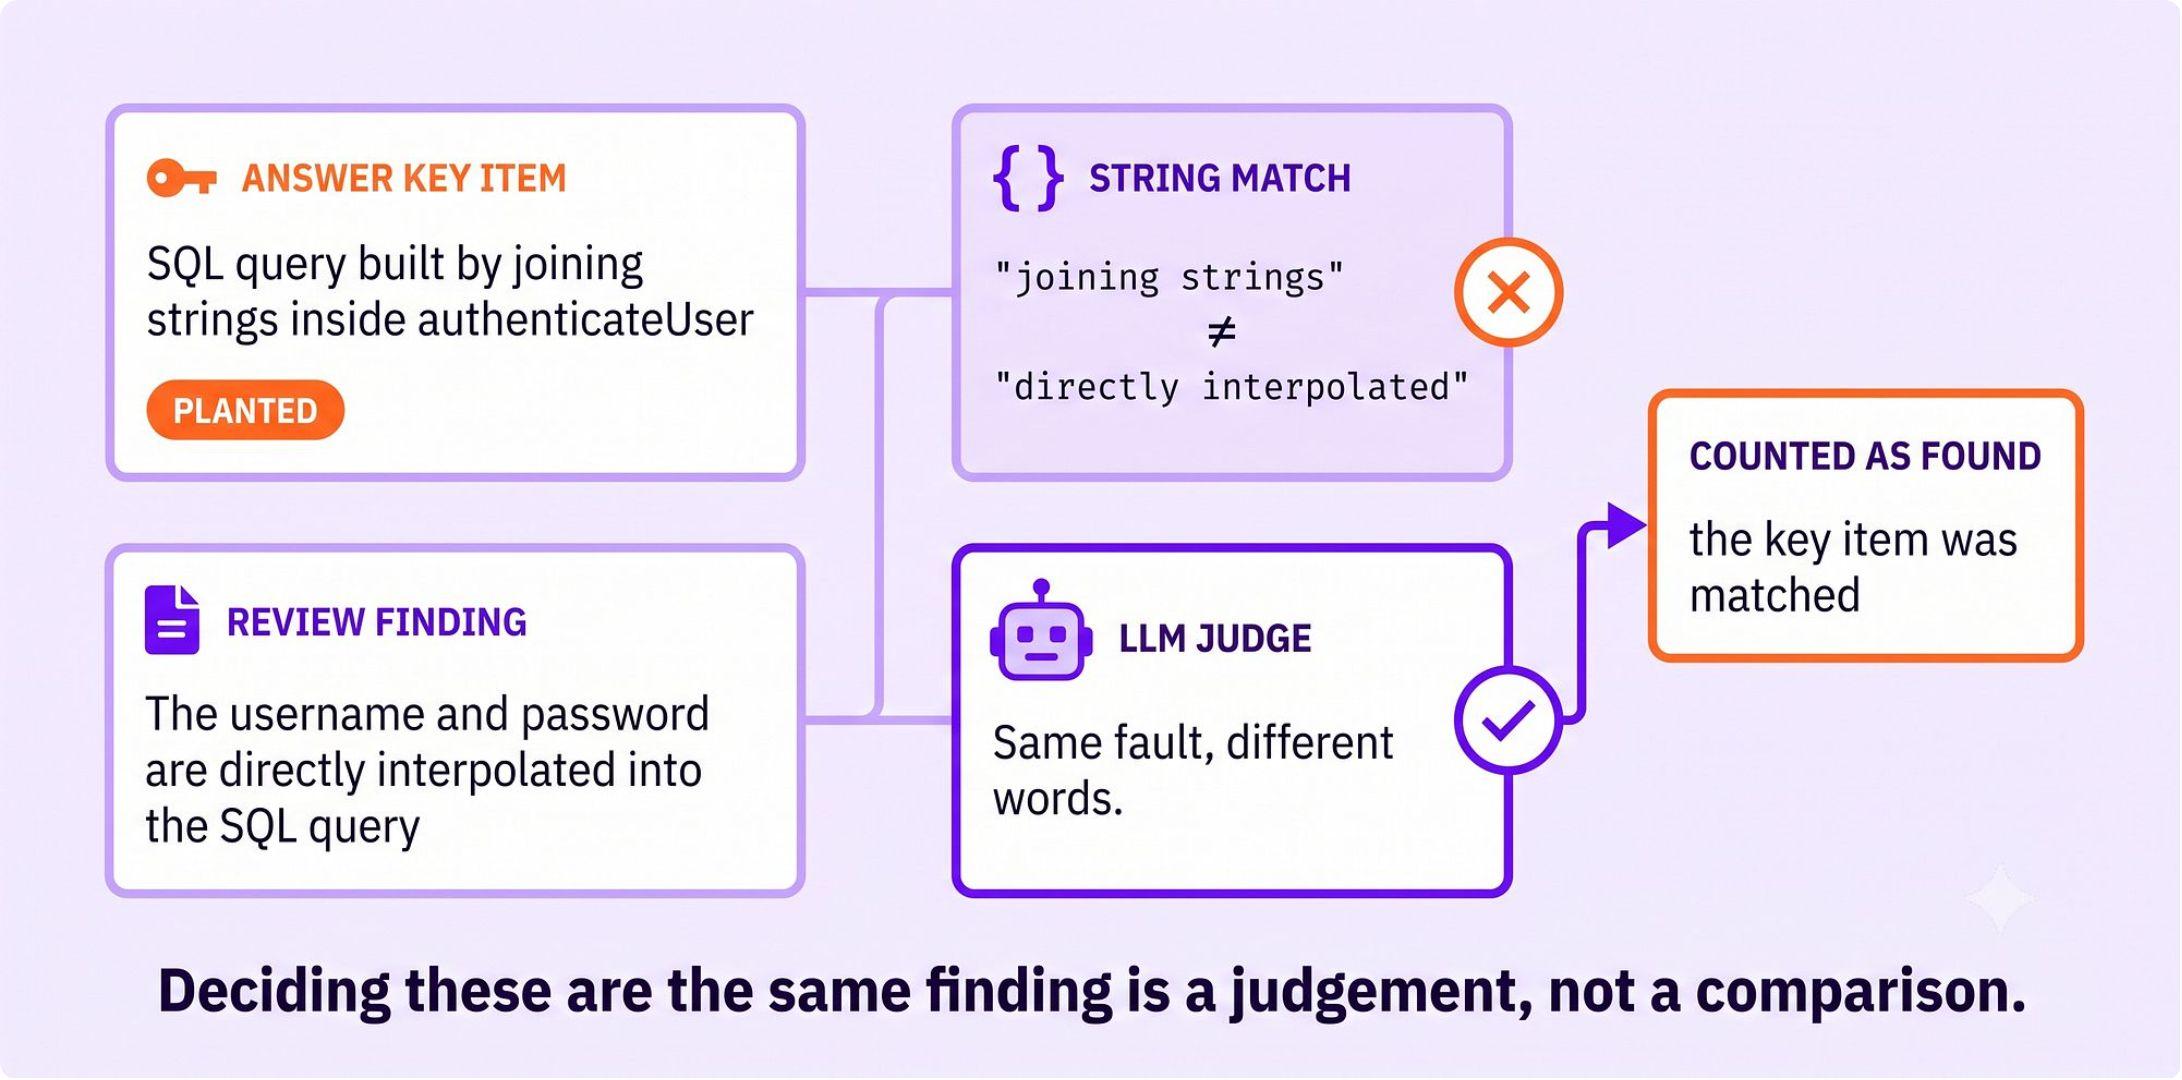
For each item in the ground truth, something has to decide whether the output contains it. Where a check can be done in code, do it in code. Whether the output parses, matches a schema or passes a test are deterministic checks, cheap and repeatable. Matching a finding written in free text against a described issue can’t be done with a string comparison, because the same problem can be described in many different ways. For that, you use another LLM to make the call. This is called LLM-as-a-judge.
How you design the judge decides how far you can trust its results. A few choices matter most:
- What it returns. A score like “7 out of 10” is hard to act on. It doesn’t say what was good or what was missing, and different runs or different judges can mean different things by a 7. A decision about one specific item, like caught or missed, is easier to check and act on, and it’s what the demo’s judge returned for each issue. Scores still suit qualities that are a matter of degree, like tone or helpfulness.
- Evidence for each decision. When the judge has to quote the part of the output behind each verdict, anyone reviewing the results can see why an item was marked caught, instead of taking the judge’s word for it.
- A rubric. Without a written definition of what counts, the judge applies its own standard, which may not be yours and may shift between runs. The rubric says what qualifies, with a stricter bar where the distinction matters. In the demo, a codebase issue only counted if the review named the team’s own function. A general recommendation like “use bcrypt” didn’t count, since it doesn’t show the review knew about the team’s function.
- What isn’t evidence. Judges tend to reward longer and more confident answers, so it helps to state in the rubric that length and confidence don’t count.
- A reliable format. Enforcing the judge’s output with a schema (section 3) means its results can be processed reliably, and a low temperature reduces how much its verdicts vary between runs.
- Arithmetic in code. Counting verdicts and computing scores is deterministic work, so it belongs in your code. The judge only makes the decisions that need judgement.
What evaluation reveals
In the demo, the same answer key and the same judge scored two versions of the code reviewer:
| Generic (8) | Tools (6) | Codebase (5) | Total (19) | |
|---|---|---|---|---|
| Level 1: a single model call | 8 | 3 | 0 | 11 |
| Level 4: the agent | 5 | 6 | 4 | 15 |
This table shows things that reading the two reviews never did.
Where each capability paid off. The agent’s gains are in the tool and codebase issues, which the single call couldn’t reach without tools or the team’s code.
Where it got worse. On this run, the agent missed three generic issues the single call had found, including the reset code returned in the API response. One run can’t tell you whether that’s a real weakness or variation between runs, but without evaluation you wouldn’t have seen the drop at all. Better overall doesn’t mean better at everything.
Which part to fix. Because every issue is tagged, every miss points to a component. A missed codebase issue points to retrieval: how the data was chunked, what query was sent, how many results came back. A missed tool issue points to the tool’s description, or the arguments the model sent. A finding the judge couldn’t credit because it was too vague points to the output format. A miss no tool would have caught points to the agent’s brief. You improve the system by changing the component that failed, instead of by trial and error.
How much to trust a difference. When you compare two versions of a system, like before and after a change, remember that the system and the judge are both non-deterministic, so a single evaluation run can be off in either direction. Run the evaluation several times and compare the averages. Then use the verdicts to see what actually changed: which issues moved from missed to caught, or the other way, and the evidence behind each one.
Evaluating the judge
The judge is an LLM, so it has its own failure modes:
- Leniency. Models are trained to be agreeable, and that doesn’t switch off when you ask one to grade. A judge can mark things correct too easily, or mistake a fluent answer for a correct one.
- Verbosity bias. Longer, more confident answers tend to score higher than shorter correct ones.
- Position bias. What the judge reads first can be weighted differently from what it reads last.
- Self-preference. A judge can favour outputs written by its own model.
- Non-determinism. The judge can give different verdicts on the same input from run to run.
So the judge needs checking too:
- Check consistency. Run it several times on the same input. If its verdicts change on an output that hasn’t changed, it isn’t reliable enough to measure with.
- Check it against people. Have people label a sample of the same cases, and measure how often the judge agrees with them.
- Use a second method. Compare the judge against code-based checks or a different model. Where they agree, you have a result you can act on. Where they disagree, you have something specific to look into.
A person has to stay in this loop. In production, a judge scores far more outputs than anyone can read, so people review a regular sample to confirm it’s still making the right calls, and check again whenever the system or the judge’s model changes.
Evaluation in production
The demo measured one thing: recall, the share of known issues that each system found. A production evaluation measures each part of the system:
- Retrieval: did the right context come back, and how much of what came back was useful?
- Generation: is every claim in the output supported by the retrieved context or the tool results?
- The whole system: precision (how many of its findings are real), relevance, latency and cost.
These can pull against each other. Improving one might cost you another, so you track them together.
Evaluation also doesn’t stop at launch. You run it on every change before it ships, to catch regressions. Once the system is live, real inputs and the things it depends on keep changing, so you evaluate samples of live traffic and add every failure you find to your ground truth. Over time, this becomes an automated layer around the system, with people checking the judges and the hardest cases.
What’s still missing
With evaluation, all four gaps from section 3 are closed. The system can reach your data, act on the world, decide its own path, and be measured while it does. But every level, from retrieval to tools to the agent to evaluation, was doing the same thing underneath. Section 8 is about what that is.
Resources
- Hamel Husain, “Your AI Product Needs Evals”
- Hamel Husain, “Using LLM-as-a-Judge For Evaluation: A Complete Guide”
- Eugene Yan, “Evaluating the Effectiveness of LLM-Evaluators”
- Zheng et al., “Judging LLM-as-a-Judge with MT-Bench and Chatbot Arena”
- Shankar et al., “Who Validates the Validators?”
- Anthropic, “Demystifying evals for AI agents”
- Ragas, “List of available metrics”
8. Context engineering
Every section so far has been about one capability: prompting, retrieval, tools, agents, evaluation. Each one closed a gap. But underneath, they were all doing the same thing. Each one changed what the model had in front of it when it generated. Context engineering is the discipline that makes that the centre of how you design a system.
What context engineering is
Context engineering is the discipline of designing systems that put the right information and the right tools in front of the model, in the right format, at the right time, so it has what it needs to do the task.
That definition is broad on purpose. You can see how broad by listing what sits in a context window on a single call:
- Instructions: the system prompt, the task and the rules the model is held to.
- Retrieved information: documents and data pulled in because the model was never trained on them.
- Tool definitions: what the model is able to do.
- Tool results: what came back once something actually ran.
- Conversation and state: the exchange so far, and whatever has built up over previous steps.
- Examples: used to pin down the format or quality of the output.
Each of these is a decision you make, and each one changes what the model produces. So context engineering covers far more than writing a prompt. It covers everything that lands in front of the model, on every call.
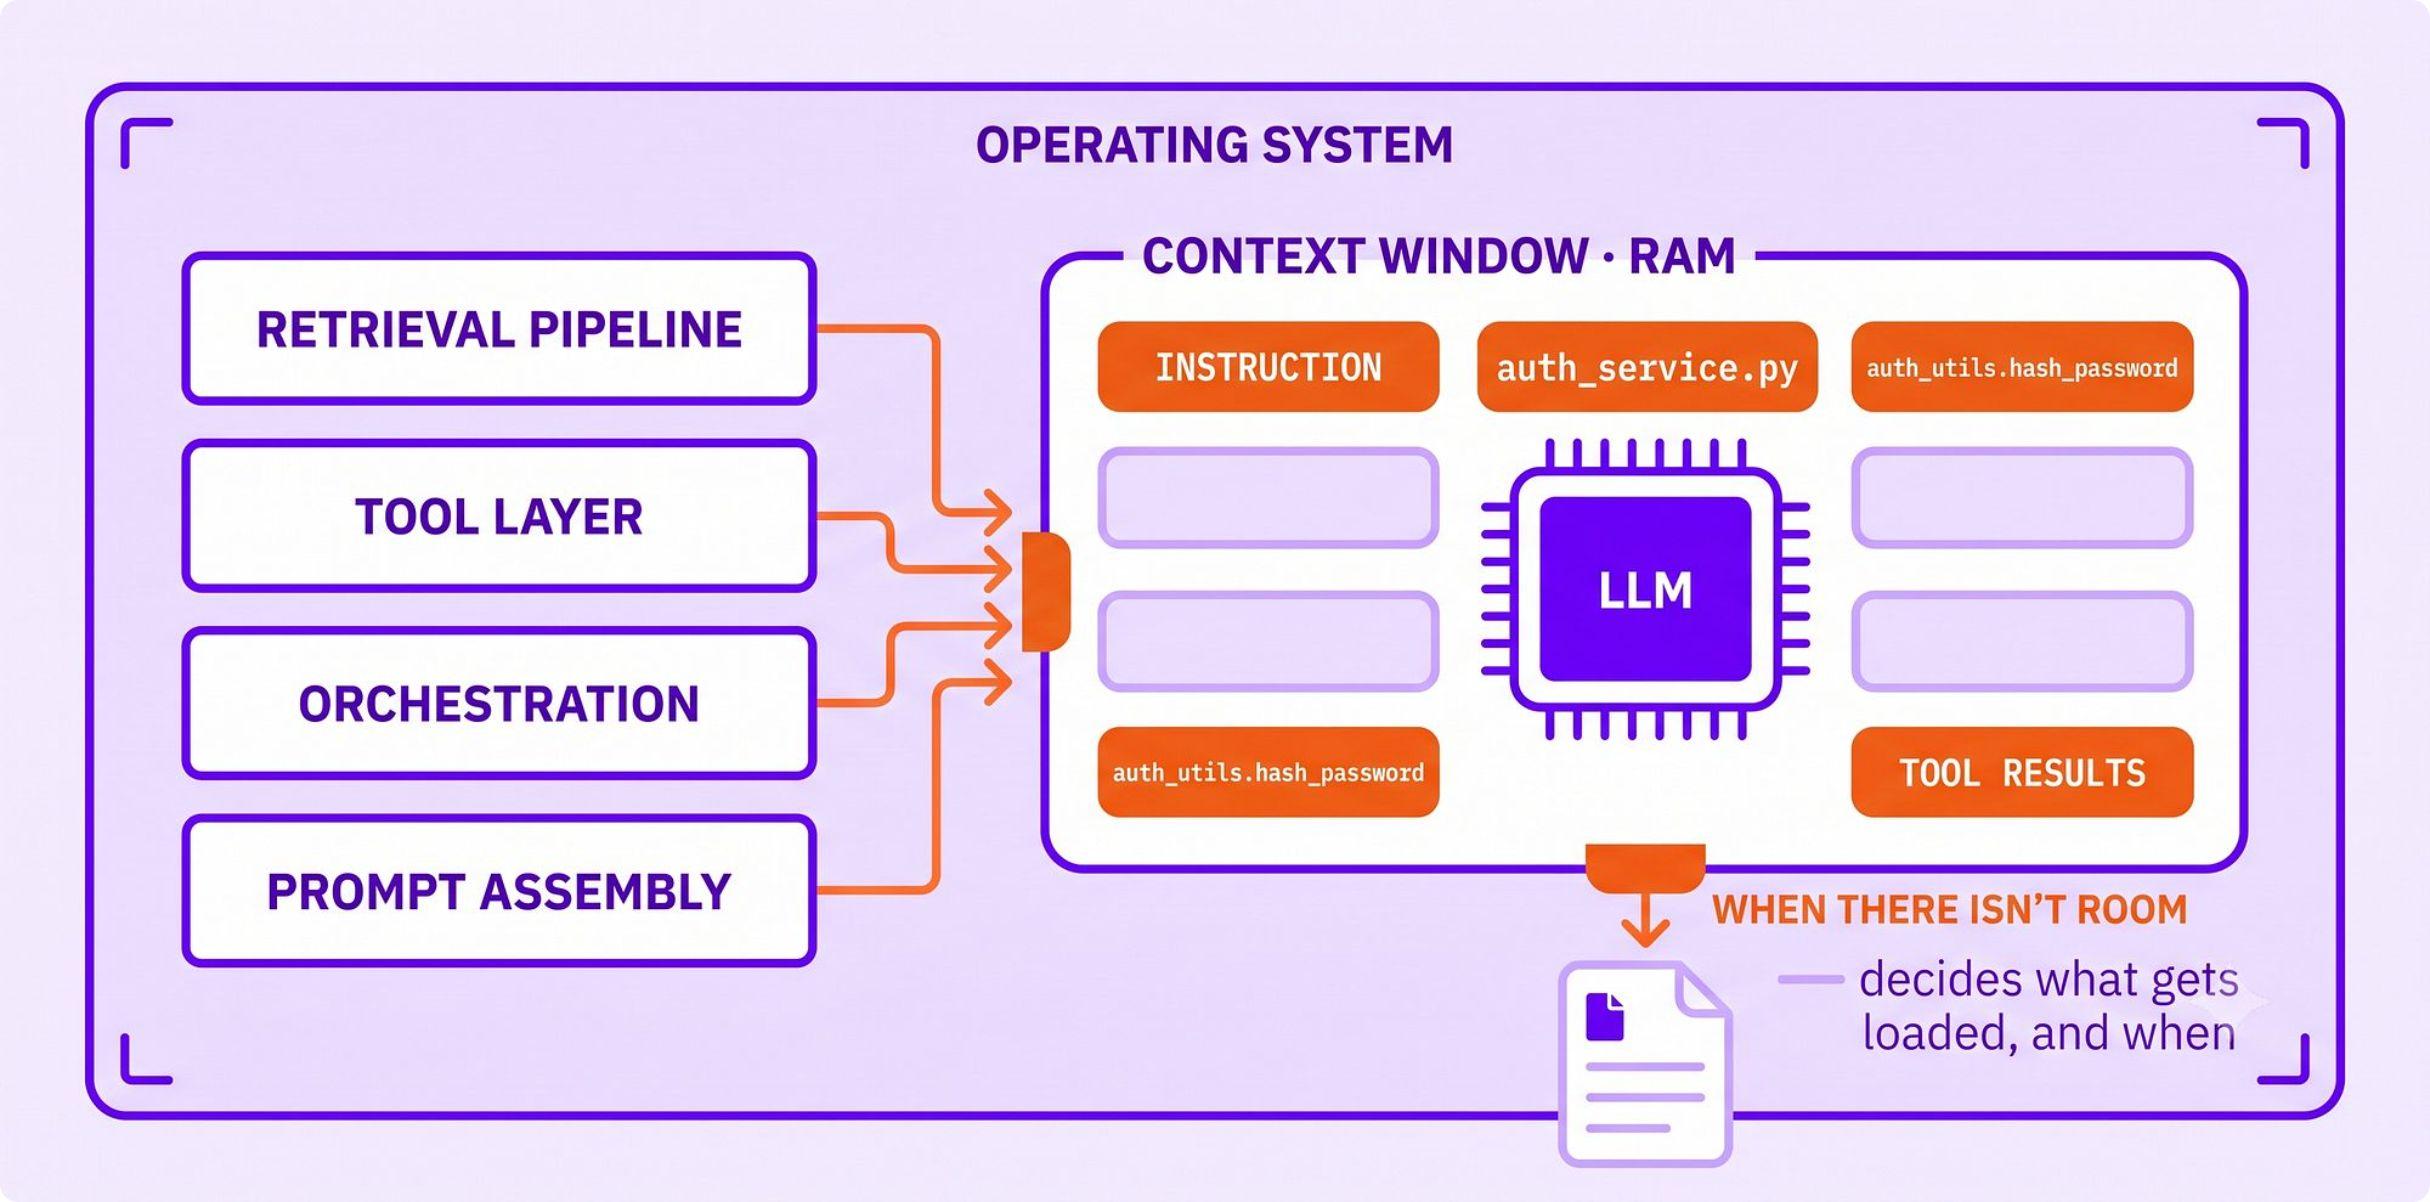
A mental model: the CPU, the RAM and the operating system
A useful way to think about this is to compare an AI system to a computer. It’s an analogy, so it isn’t exact, but it shows clearly where the work in an AI system sits.
The model is the CPU. It processes whatever it’s given. It doesn’t get smarter between calls, and it doesn’t remember the last one. In the masterclass, the model that gave the generic review at the first level was exactly the same model that named the team’s own functions at the fourth.
The context window is the RAM. Anything specific to the task that the model wasn’t trained on has to be loaded into the context for the model to use it. If it isn’t there, it doesn’t matter how relevant it is: the model can’t use it.
Everything you build around the model is the operating system. The retrieval pipeline, the tool layer, the orchestration, and the code that assembles the context before each call decide what gets loaded, when, and what gets left out when there isn’t room for everything.
Since the CPU is fixed, the difference between a system that works and one that doesn’t sits in the operating system around it. That’s why two teams can build on the same model and end up with very different products.
The analogy has one important limit. Data sitting unused in RAM doesn’t change how a program runs, but everything in the context shapes the model’s output. Irrelevant content dilutes it, and a longer context is used less reliably (section 4). So the operating system’s job is to load what the task needs, and to keep out what it doesn’t.
Every level changed the same thing
Seen through that model, each level of the masterclass was a change to the operating system, and never to the model:
| Level | What the operating system loaded |
|---|---|
| 1. Prompting | Only what you assembled by hand before the run: the instructions and the file |
| 2. RAG | The team’s own code and standards, retrieved for each request |
| 3. Tool use | Results produced on demand: linter findings, complexity scores, live documentation |
| 4. Agents | Whatever the agent decided it needed, as it went. The agent became part of the operating system |
| 5. Evaluation | Nothing new. It measured the context the system assembled, and showed which part fell short |
That’s why, when an AI system isn’t working, the answer is rarely the model. Look first at what’s being loaded into the context, by which part of the system, and whether it’s enough for the job.
Managing context as it grows
In a single call, the context is assembled once. In an agent, or any long-running task, the context grows with every step: each tool result and each turn of the conversation is added to it. Left alone, it eventually fills up, and long before that it starts to degrade. Common ways to manage it:
- Load what’s needed when it’s needed. Give the model a lightweight overview, like the agent’s map in section 6, and let it fetch details as it goes, instead of loading everything at the start.
- Clear what’s no longer needed. Old tool results that have already been used can be removed from the context.
- Compact the history. When the context gets long, summarise the earlier part and continue from the summary. The risk is losing a detail that turns out to matter later.
- Keep notes outside the context. The agent writes key facts and progress to a file or store, and reads them back when it needs them.
- Split the work across agents. A sub-agent works on one part of the task in its own fresh context, and returns only a short result.
- Keep stable content at the start. Instructions and tool definitions that don’t change between calls can be cached by the provider, which cuts cost and latency. That only works if they stay the same and come first.
The loop
Generalised, building any AI system comes down to four steps:
- Assemble the context. Retrieval brings in what’s relevant, tools produce what has to be computed, and the prompt frames the task. In an agent, the model also decides what to gather.
- Generate. The model produces output from what you assembled.
- Evaluate. Check whether the output is correct, complete and reliable across runs (section 7).
- Improve. A good evaluation shows which part of the assembly came up short. Missing the team’s own code points to retrieval. A missing measured fact points to the tools. A finding that’s right but unusable points to how you asked for the output. Fix that part, and assemble again.
None of this loop is specific to code review. The domain, the data and the stack will change from one system to the next. The loop stays the same.
Resources
- Anthropic, “Effective context engineering for AI agents”
- Philipp Schmid, “The New Skill in AI is Not Prompting, It’s Context Engineering”
- Drew Breunig, “How Long Contexts Fail”
- Manus, “Context Engineering for AI Agents: Lessons from Building Manus”
- LangChain, “Context Engineering”
- Anthropic, “Compaction overview”
9. Your path into AI engineering
Once you understand how an AI system is built, the next questions are about you. Is there more to learn than the techniques in this guide? Do you need to learn to train models? Which jobs are out there, what do they ask for, and how do you get ready for one? What should you build to show you can do this work? Answering these starts with how the field is organised.
How the field is organised
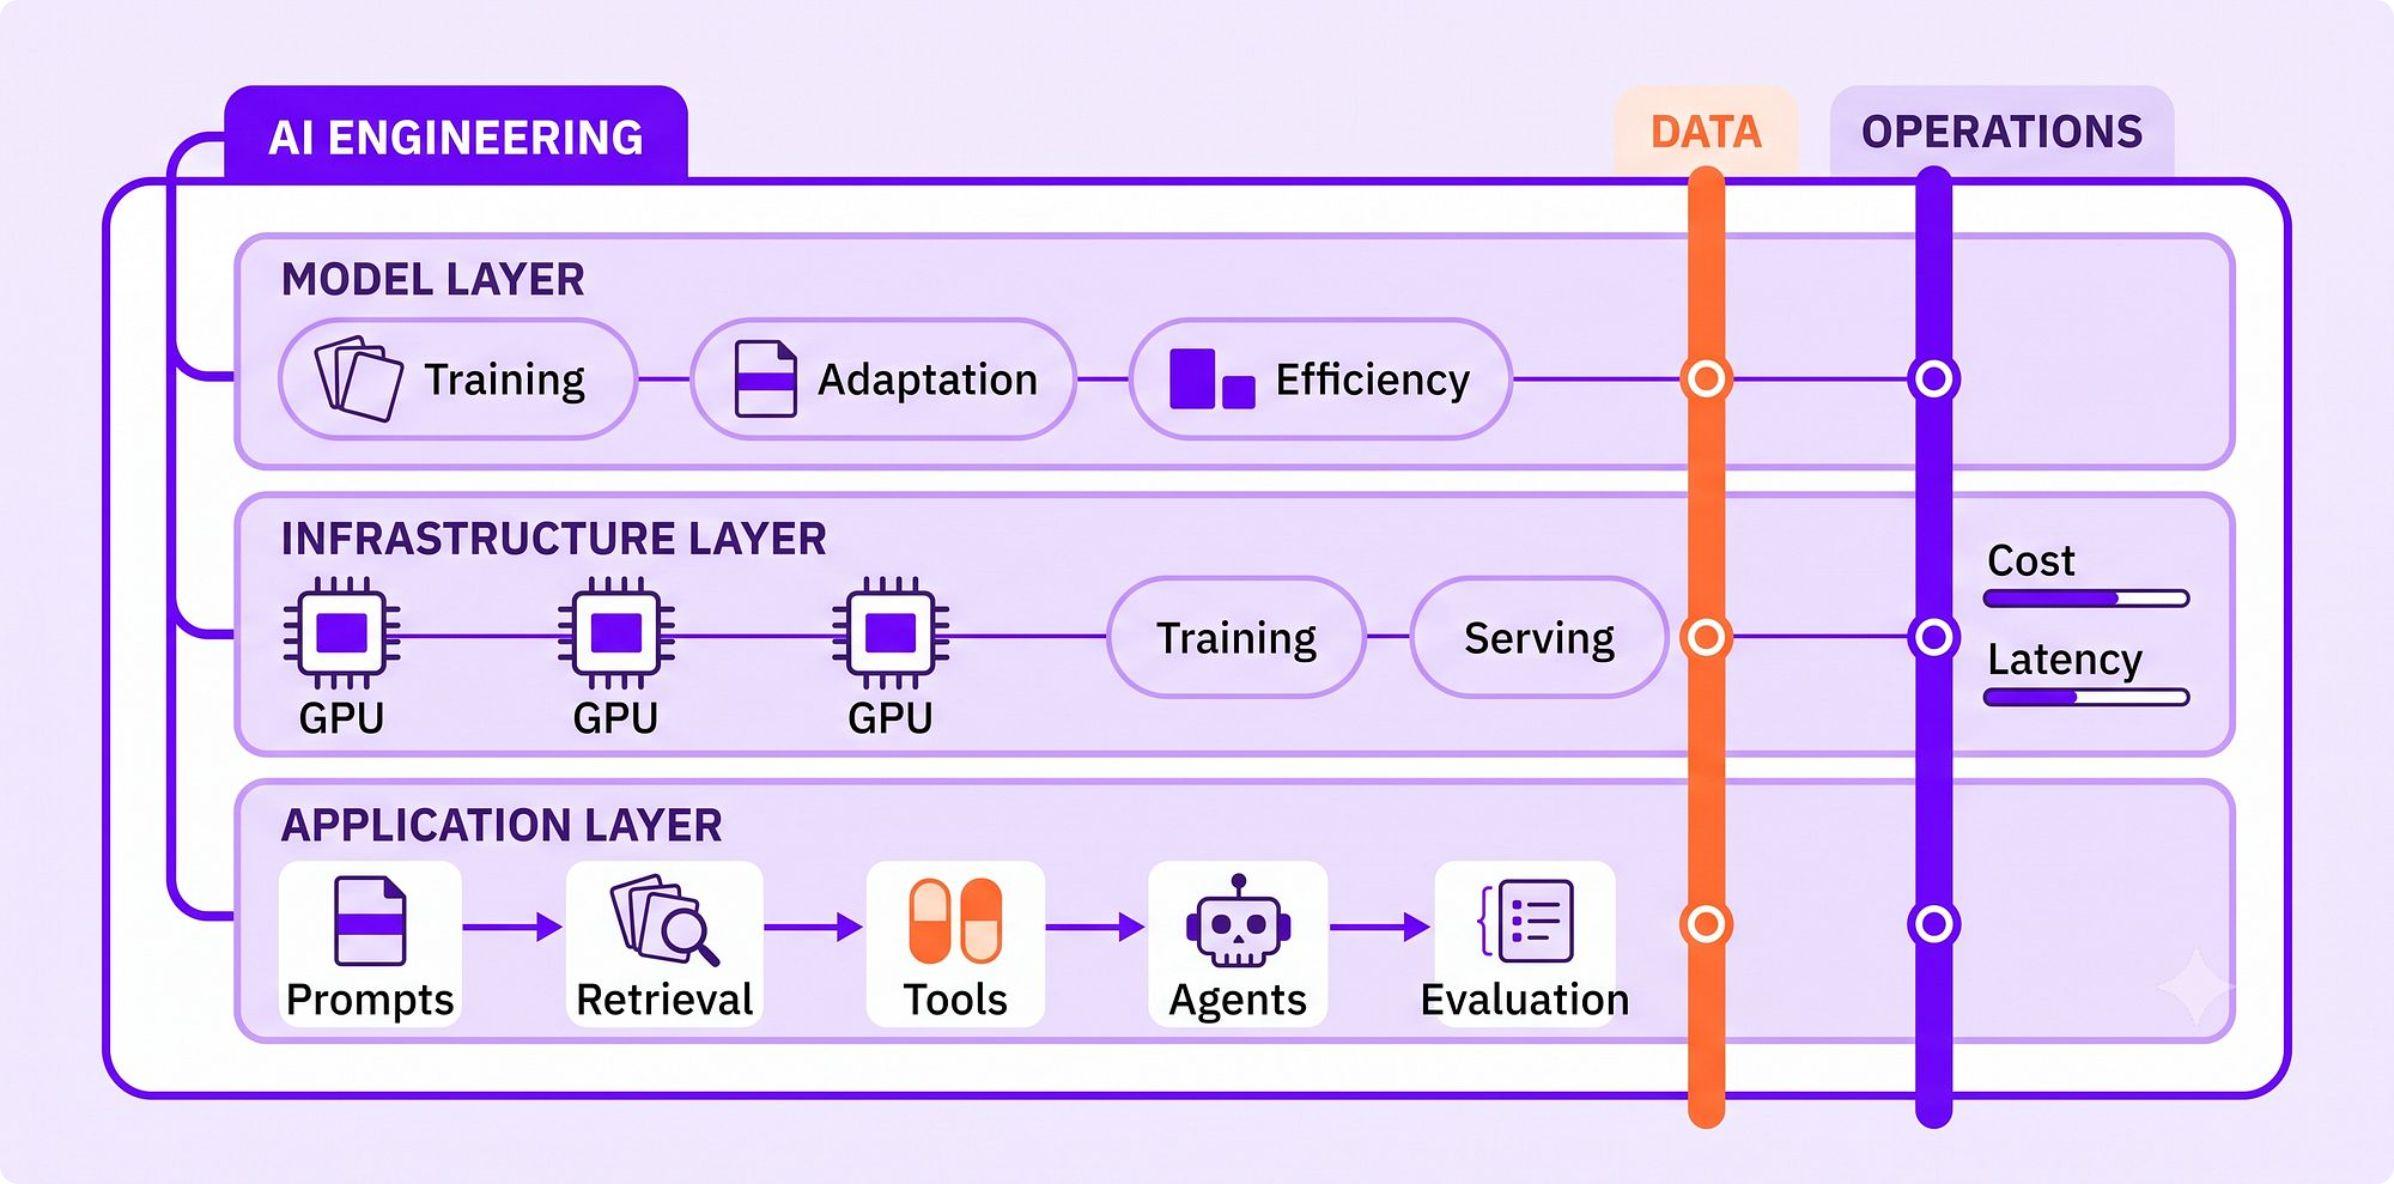
AI engineering has split into subdomains, the same way software engineering did. Software has frontend, backend, distributed systems, data and infrastructure: all software engineering, but each asks for different skills, and people build careers inside one or two of them. AI is going the same way. Broadly, it has three layers.
| Layer | The work | The core skills |
|---|---|---|
| Model | Building the models themselves: training them, adapting them after training so they follow instructions and behave as they should, and making them efficient enough to run | Deep learning, how language models work, and the math underneath. If you plan to train models, the math isn’t optional |
| Infrastructure | Running training across clusters of GPUs, serving models so they respond fast, and bringing down the cost of every request | Systems and performance engineering: distributed computing, GPUs, and how models run on hardware |
| Application | Building a system around an existing model that does a real job: the prompts, retrieval, tools, agents, evaluation, and the product people use | Strong software engineering, plus everything in this guide |
Two kinds of work run across all three layers:
- Data. At the model layer, this means building training datasets. At the application layer, it means turning an organisation’s own data (documents, code, conversations, tickets, most of it unstructured) into something a system can retrieve from. That covers building and maintaining the pipelines that clean, chunk, embed and index it as it changes. Because these systems work in natural language, the shape of that data can make or break the application.
- Operations. This means keeping systems running well in production, called MLOps for traditional machine learning and often LLMOps for systems built on language models. It covers monitoring, continuous evaluation, versioning prompts and models, guardrails, and keeping cost and latency under control. In AI applications, much of it falls to whoever builds the system, because every design choice shows up in the accuracy, cost and latency.
In practice, these areas overlap, and most people’s expertise spans more than one.
The roles
Job titles vary between companies, but these are the main roles in each layer.
| Layer | Role | What they do |
|---|---|---|
| Model | Research scientist | Decides what’s worth trying next: forms hypotheses about how models could improve, designs the experiments, and publishes the results. The most theory-heavy role. At top labs, it usually asks for a PhD or an equivalent research record |
| Research engineer | Makes those ideas work at scale: builds the training code and data pipelines, splits training across many GPUs, and keeps runs that last weeks reliable. Often co-authors the research | |
| Machine learning engineer | Puts models to work on a specific business problem: data, training or (more often now) fine-tuning, evaluation, deployment and maintenance | |
| Infrastructure | AI infrastructure engineer | Owns the GPU clusters models are trained on: schedules jobs, keeps the hardware fully used, and keeps long runs reliable |
| Inference engineer | Owns serving: makes each request faster and cheaper, with techniques like batching, caching and quantization | |
| Application | AI engineer (or applied AI engineer) | Builds products on existing models. Increasingly splits into specialisations: retrieval, agents, and the internal platform other teams build their AI features on |
| Forward-deployed engineer | An applied AI engineer who works inside a customer’s organisation: scopes which problem is worth solving, builds the system on the customer’s data, and stays until the team is really using it | |
| Across layers | AI data engineer | Builds and runs the pipelines that get data ready for models and applications |
| MLOps / LLMOps engineer | Runs AI systems in production: deployment, monitoring, evaluation and cost |
The model-layer roles share deep learning expertise and the math behind it. The infrastructure roles share systems programming, distributed computing and a deep understanding of GPUs.
Choosing a direction
There’s no single right role. The choice comes from putting four things together:
- Your current skills.
- The time you can put into learning.
- Which layer’s work genuinely interests you.
- What the industry is hiring for, and paying.
If you’re a software engineer, the application layer is the most direct move. Most of what it needs, you already use every day: designing systems, writing production code, integrating APIs and working with data. What you add is the AI-specific part: retrieval, tools, agents and evaluation. It’s also where much of the work is. Only a handful of organisations train frontier models, while a great many companies are working out how to build products with them.
And as more software ships with AI features built in, some application-layer skill is becoming part of what’s expected of engineers generally, whatever their role.
Finding out what a role asks for
Job titles alone won’t tell you what to prepare for. The same title can mean quite different work at two companies, and some teams deliberately blur engineering and research. So go by what the job actually asks for:
- Collect ten job postings for the role you’re aiming at, from teams you’d genuinely want to join.
- For each one, write down two things: what the person is expected to build or deliver, and what proof they ask for that you can do it.
- Look for what repeats. After ten postings, the same items keep appearing. That repeated list is what you prepare for.
For applied AI engineering, the list usually comes out something like this:
- The work: building and shipping AI features on existing models, working with retrieval and agents, designing evaluations, and making systems reliable, fast and affordable to run.
- The proof: systems you’ve actually built under real constraints, like cost, latency and messy data, where you can explain the trade-offs you made and why.
How to get ready
If the proof is a system built under real constraints, then you get ready by building one. That comes down to two steps.
1. Go deeper on each part of your layer. For the application layer, this guide is the map, and each part goes much further than it can cover: retrieval has its own design decisions, agents have their own failure modes, evaluation has its own methods, and production brings cost, latency, reliability and guardrails. The best way to learn each one is by building with it, because that’s where you have to make the real decisions and live with their trade-offs.
2. Build one real system, end to end, on real data. The best problems often come from your own work: something your team does over and over that takes too long. One strong example is an on-call assistant. When something breaks in production, the engineer on call has to work out fast what’s wrong. That means digging through past incident reports, troubleshooting guides, old chat threads and the code itself. An assistant that searches all of that, finds the closest past incidents and says what to check first solves a problem most engineers have felt.
Production systems tend to be built in the same order, whatever they do. Here’s that order, on the on-call assistant:
- Scope it before you write code. Decide what it covers, what questions it should answer, what it should produce, and what mistake would be unacceptable. Here, the questions are the ones asked in the first minutes of an incident: has this happened before, what caused it, and what fixed it. The unacceptable mistake is confidently sending someone down the wrong path mid-outage.
- Do the data work. Work out what data the system needs, source it, sort out access control and security, fill the gaps where something was never written down, and clean it. Incident history and team docs are often incomplete or out of date.
- Set up evaluation before you build. Build a set of real inputs, each paired with what a good output would contain, agreed with the people who know the domain. Include the common cases, the hard ones, and cases where the right answer is not to answer. Here, that means taking incidents your team has already resolved, using what the on-call engineer first saw as the input, and checking the expected answers with the engineers who handled them.
- Build the smallest version first, and let evaluation decide what to add. Plain retrieval over incident reports might get you most of the way. If the evaluation shows it keeps missing incidents whose cause only showed up in the logs, add a tool that searches the logs, and measure again to see whether it helped. This is the loop from section 8, running on a real system.
- Design it to fail gracefully. Decide what happens when retrieval returns unrelated incidents, when the model provider is slow or down, or when the relevant material won’t fit in the context. A model will still produce a fluent, confident answer when it doesn’t have enough to go on, so the system has to recognise that case and say so, instead of guessing.
- Run it on real incidents, and learn from them. Log every question, what was retrieved, what the system answered and what it cost. Add every wrong or unhelpful answer to your evaluation set, so the next version is measured against it.
Build one system like that, and you learn the techniques and the production practice together.
What interviews test
Interviews for applied AI engineering roles tend to put you inside a real system, at a design decision or at the moment something goes wrong, and ask what you’d do and why. For example:
- Design a support assistant that answers from 50,000 help articles in under two seconds, and either gets it right or admits it doesn’t know.
- A user asks a question about a 200-page PDF. Walk through what happens from the moment they hit enter to the moment the answer comes back.
- Your search returns results that look related, but aren’t what the user meant. What’s going wrong?
- How do you know your AI feature is actually good, and how would you measure it?
- You changed a prompt. How would you know it made the product better overall, and not just on the one example you tested?
- Your token costs tripled last month, and nobody changed the code. What could have caused it?
- Design an agent that books an employee’s travel end to end, with one hard rule: it never spends money without a person approving the charge.
What these questions test:
- Whether you can make a design decision and explain the trade-off behind it.
- Whether you can back that decision with evidence, beyond intuition.
- Whether you understand how the parts of a system affect each other.
The follow-up questions keep pushing on each answer until they reach the edge of what you actually understand.
Showing your work
That’s why how you build a project matters as much as what you build:
- Make the real decisions yourself, and weigh the trade-offs, instead of accepting whatever a tutorial or framework defaults to.
- Do the data work properly.
- Run experiments and measure the results, so numbers back every claim you make about the system.
- Write your reasoning down as you go, so you know exactly why every piece is there.
Then, when an interviewer asks why you made a choice, you’re answering from something you built, tested and measured. Beyond interviews, that’s what turns what you’ve learned into judgement: the next time you face a problem you haven’t seen, you’ll know which questions to ask first, where systems like this tend to break, and how to find out whether what you built actually works.
Go deeper on your layer by building with it, build one real system the way production systems get built, and make the decisions behind it visible.